 Building mosaics is always a nice break from the intensity of creating sculptures. Since no computers are used in creating the three dimensional models, there is a lot of mental effort, trial and error, and visualization required. Mosaics are generally much more straightforward. With the aid of a computer application I have written for myself, instructions can be printed out, and once all of the pieces are obtained, the process is fairly simple (I am not currently release this software, so please do not email me with questions about it. My FAQ page lists some mosaic software alternatives).
Simple but still time consuming (and monotonous).
In late summer of 2002 I was contacted by an event company which was looking for a mosaic to be built for someone. At first I didn't think I would have the time to complete the project for them by the requested mid-October deadline because the earlier project was likely to keep me busy through December.
We flushed out the details, though, and discussed exactly what this project would involve. A grayscale mosaic was decided upon with dimensions of approximately four feet by five feet. I was sent a digital image of the portrait, and ran it through my software. In a matter of seconds I had this GIF to show the client as a rough idea as to how the final mosaic would look.
The client liked it, so we started negotiating the details of the contract.
Of course, I still wasn't sure I could commit due to time constraints.
As luck would have it, however, I ran into a friend whom I had not seen in a while, and thought, 'hmmm... I wonder if she would want to build the mosaic for me?' The 'she' in this case was Lauren, and, yes, she said she'd be happy to give it a try.
So with the contract lined up, and an assistant at hand, the project was ready to go.
Oh... but wait... who is this guy in the picture?
I kept forgetting to ask the event company. As the company I was dealing with was entitled Fandango Events, I soon began referring to this guy as 'Mr. Fandango.' Of course, this obviously wasn't correct since he didn't actually work for Fandango Events (not to mention that 'Fandango' just wasn't his name), but I needed to have some name in my head, so 'Mr. Fandango' it was.
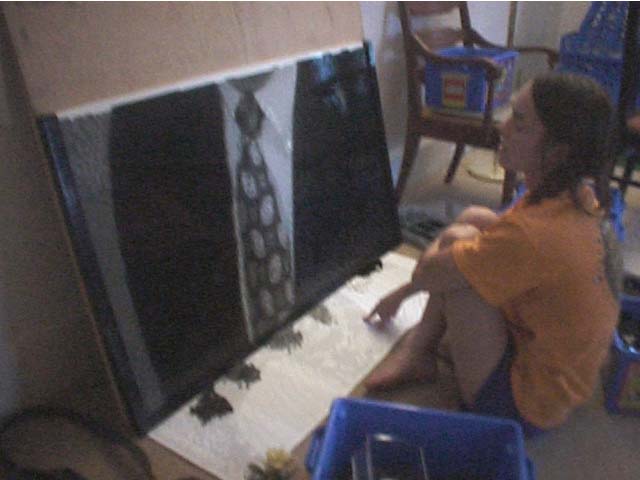
The first pieces of the mosaic where clicked together exactly 4 weeks before the mosaic was due.
It was to be built in 'studs up' fashion, meaning that when displayed the LEGO bricks were stacked atop one another and their smooth sides were viewed (this differs from other mosaics that I had built in the past which were 'studs out' -- like Mona and San Francisco).
Since the mosaic was to be so large, I decided to actually build it two rows thick. The back row would consist mainly of 1x4 bricks glued together for strength while the front row would be built with all of the tiny gray pieces and would comprise the final image.
The basic routine established by Lauren and me was that each day I would glue 10 brick rows in the back layer and then she would fill in the front layer (not using glue -- I didn't want to subject my assistant to the unpleasantries of noxious fumes). Once her rows caught up with mine, we 'doubled back' some of her pieces along the top row so that the two layers would be interlocked. In this way we were sure that the glued layer lended its strength to the image layer.
We stuck to this building scheme regularly for about five days each week (Lauren took Tuesdays off due to conflicts with school and such, and I was out of town a couple of weekends). As the mosaic was 167 brick rows tall plus a top and bottom border, we had it completed in three weeks -- one full week ahead of schedule.
At some point during these three weeks I finally remember to inquire about this man's identity.
Mr Fandango is, in fact, named Bill Ezzell, and he's the incoming CEO of the American Institute of Certified Public Accountants. Evidently he is a big LEGO enthusiast (good thing).
As the event at which the mosaic was to be unveiled was to be in Hawaii, we actually built the mosaic inside the shipping create constructed for it. Once completed the lid to the crate was secured and the whole thing awaited the arrival of the freight truck.
In all there were about 40,000 pieces used in this project. About 5,000 of those were the glued pieces in the back layer, the rest were used in the actual image (yes, Lauren, you clicked together about 35,000 pieces).