


| Estimated Inventory | ||
|---|---|---|
| Index | Tile | Total |
| 1 | 4 | |
| 2 | 70 | |
| 4 | 110 | |
| 5 | 3 | |
| 7 | 87 | |
| 8 | 15 | |
| 9 | 50 | |
| 10 | 54 | |
| 11 | 167 | |
| 12 | 75 | |
| 14 | 9 | |
| 15 | 11 | |
| 16 | 11 | |
| 17 | 154 | |
| 18 | 17 | |
| 21 | 93 | |
| 22 | 13 | |
| 23 | 28 | |
| 24 | 21 | |
| 25 | 7 | |
| 27 | 4 | |
| 28 | 20 | |
| 30 | 175 | |
| 31 | 74 | |
| 32 | 10 | |
| 35 | 160 | |
| 36 | 76 | |
| 37 | 39 | |
| 38 | 113 | |
| 39 | 35 | |
| 41 | 171 | |
| 42 | 215 | |
| 43 | 6 | |
| 44 | 66 | |
| 45 | 5 | |
| 46 | 2 | |
| 47 | 70 | |
| 48 | 107 | |
| 3-2x2 | |
5 |
| 6-2x2 | |
4 |
| 8-2x2 | |
2 |

Idiot me.
I have since learned that I should hold onto all of my LEGO pieces. If I am going to part with them, they should be through bartering, or maybe selling, but never, never give them away. Sure as I do, I will think of some project that requires the absent pieces.
This mosaic is such a case.
About 2 years ago I realized that I could maybe use those printed tiles I had been giving away to build a cool mosaic. Various posters and puzzles using a 'Photo Mosaic' effect had become popular during the past decade, and I thought that I might be able to construct a mosaic using a similar idea: take advantage of the additional colors and designs of the decorated tiles to fashion an image.
I started poking around the web to find freeware trial versions of various photo-mosaic applications. I settled on one called MAZAIKA.
The first big obstacle to this project was the fact that I could only find about 50 different decorated tiles made by LEGO (I was looking at 1x2 sized tiles). This may seem like a reasonable amount, but for mosaics of this type, it is best to have hundreds, if not thousands, of component photos or images.
Of course, if I rotated the printed tiles 180 degrees, the image on the tile would be different, so technically I could double my input count.
I realized that if I could rotate just 90 degrees as well, that would give me even more variety.
The problem was that none of the photo-mosaic appliactions I found (including MAZAIKA) would accept component images of varying proportions (they all had to be the same size and shape). Furthermore, MAZAIKA would only accept base images that were either 4x3 or sqaure rectangles. 1x2 LEGO tiles, are, of course, of 1x2 proportion... so this was another problem.
I solved this quandry by realizing that if I took any two 1x2 printed tiles, I could couple them into a 2x2 sqaure. Furthermore, with each pair I could rotate each of the individual tiles as well as the whole 2x2 square to vastly increase the variety of base images (which would then all be 2x2 squares, not 1x2 rectangles).
I decided to use the 48 1x2 printed tiles which seemed to be the most numerous on Bricklink. I eventually ordered 1 of each tile and scanned them into my computer.
Now, with 48 different, I was not about to go into Photoshop 'by hand' and create every possible 2x2 combination built from 2 1x2 tiles. Calculations told me that there would be over 18,000 different combinations!
Time to write a quick program of my own.
I whipped up a little Java application that read in all 48 1x2 scanned images and saved out every possible image formed by combining any 2 of the tiles (with any possible rotation). I ended up with 18,432 different (square) images.
For good measure I had also picked up a few genuine 2x2 printed LEGO tiles, but with only 10 different ones on hand, their contribution (even with 4 rotations each) was minimal.
Anyway... I now had many, many digital component images.
I ran my base image through the MAZAIKA program at different sizes and settings (to be honest, I'm not sure I knew what all of the setting did). At reasonable sizes, the program still took hours to construct the photo-mosaic.
Obviously, a larger image would give me better detail and resolution in the end, but once I realized that the average price for a 1x2 printed tile was in the neighborhood of 20 cents, I decided not to make it too big (besides, at any price, there is only a finite quantity of these tiles...).
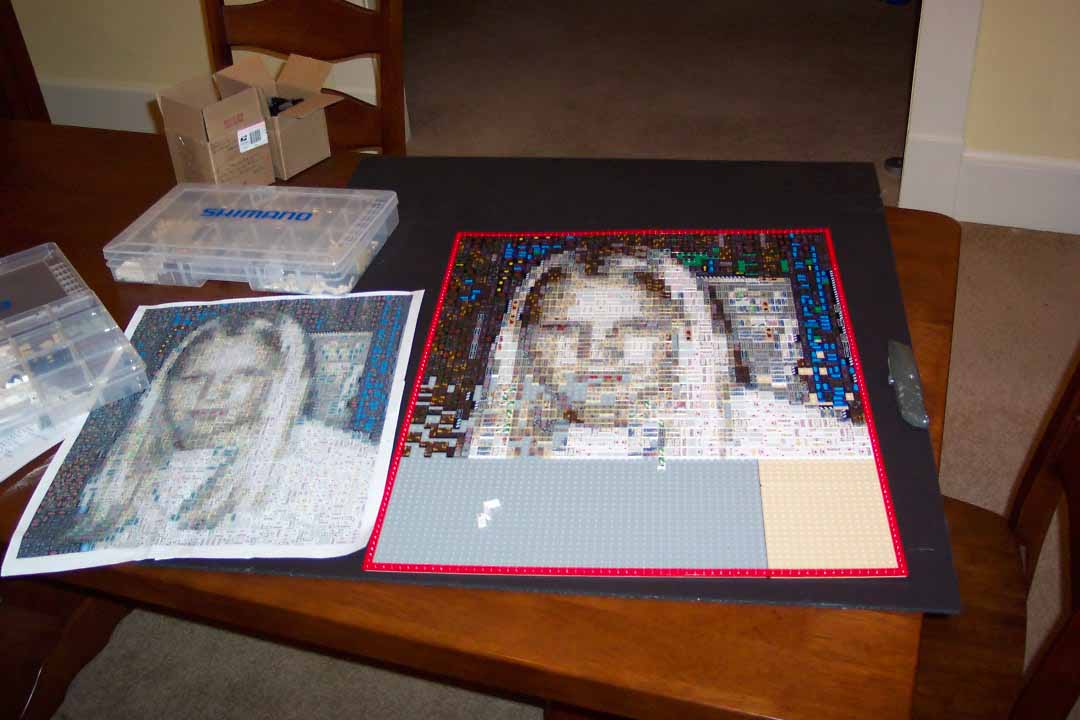
Once I settled on a final processed image (which would be 62 by 78 studs -- plus a 1 stud border surrounding), I printed out the results and got an inventory of needed tiles.
Oh man... was I going to need a lot of tiles. I have put a table to the right that lists estimates of how many of the various tiles I needed. In the end this was not exactly accurate because I made some substitutions on my own for various reasons (lack of quantity of some tiles, desire to have more variety, and so forth).
It took me a few months to acquire all of the tiles (and several hundred dollars, I might add). All for a mosaic that is only 20-by-25 inches.
Yikes.
But, it worked. As with other experimental mosaics I've done, there's always that fear that I will invest a whole bunch of time and money, and in the end it won't look right. That's never been the case, but there's always that fear.
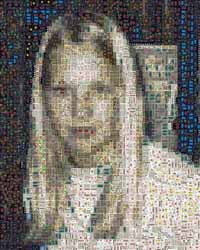
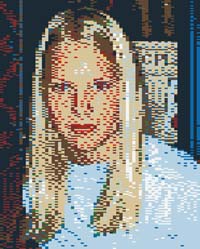
Not only did the image come out, but the advantage of using printed tiles over basic bricks or plates in a Studs-Out or Studs-Up fashion is obvious. Below is a table comparing the three possible versions all at 62 studs wide (the last two use the following colors: White, Black, Red, Blue, Yellow, Green, Tan, Brown, Medium Blue, and Dark Red).
| Original | Printed Tile | Studs Out | Studs Up |
|---|---|---|---|
 |
 |
 |
 |
Here are a few more images:
Oh, and finally, to answer the most obvious question about this mosaic: I don't know who she is; honestly, I just grabbed the picture off the web.